Table of Contents
- 1 Linux Distribution
- 2 Ways to Get Access to Linux
- 3 Getting Connected
- 4 Directory Structure
- 5 The Shell
- 6 Basic Linux Commands
- 7 Environment Variables
- 8 Working with Directories
- 9 Listing Files ('ls' command)
- 10 Working with Spaces in Names
- 11 File & Directory Permissions
- 12 View Files & the Nano Editor
- 13 Editing Files in Vi
- 14 Editing Files with Emacs
- 15 Finding Files & Directories
- 16 Graphical Editors
- 17 Deleting, Copying, Moving and Renaming Files
- 18 Wildcards
- 19 Input, Output (I/O) and Redirection
- 20 Comparing Files
- 21 Searching in Files and Using Pipes
- 22 Transferring and Copying Files over the Network
- 23 Environment Variables
- 24 Processes and Job Control
- 25 Scheduling Repeated Jobs with Cron
- 26 Switching Users and Running Commands as Others
- 27 Shell History and Autocompletion
- 28 Installing and Managing Software
- 29 Addendum: Connecting to a Linux Virtual Machine (VM) over the Network
Linux
Linux Distribution
-A Linux distribution is comprised of the Linux kernel and additional software
- https://DistroWatch.com
- Red Hat Enterprise Linux (RHEL)
- Fedora
- Ubuntu
- Debian
- SuSE Linux Enterprise Server (SLES)
- OpenSuSE
Ways to Get Access to Linux
- Web Based Command Line Access
- Web Hosting Shell Accounts
- VPS (Virtual Private Server) or Cloud Server
- Live Linux Distro
- Install on Hardware
- Use Preinstalled Images with VirtualBox
Getting Connected
- If you have physical access or if the Linux system is running in a VM, log in directly.
- To log in over the network use SSH.
- SSH replace "telnet"
- PuTTY is a Windows SSH client.
- The command line utility ssh is used in Mac
- Detailed Instructions
Directory Structure
- Common Directories
/: “Root,” the top of the file system hierarchy./bin: Binaries and other executable programs./etc: System configuration files./home: User home directories./opt: Optional or third party software.- e.g. Google Earth
/tmp: Temporary space, typically cleared on reboot./usr: User related programs./var: Variable data, most notably log files.- For example,
/var/logs
- For example,
- Applications that are not part of the base OS can be installed in:
/usr/local/opt
- Comprehensive Directory Listing
The Shell
- The shell is the default user interface.
- Use the terminal application to get to the CLI.
- Shell prompts can vary greatly in appearance.
jason@linuxsvr ~]$normal user[root@linuxsvr:~]#super user- Tilde Expansion:
~jason= /home/jason~pat= /home/pat~root= /root~ftp= /srv/ftp
- Root is the superuser.
- Server distributions do not include GUIs
Basic Linux Commands
ls: Lists directory contents.-l: long listing formatcd: Changes the current directory.- cd (with no arguments): Back to home directory
pwd: Displays the present working directory.cat: Concatenates and displays files.echo: Displays arguments to the screen.man: Displays the built-in manual.man -k calendar: search manual pages using keyword- Move around man pages:
space: display the next pageenter: move down one lineg: go to top of pageG: go to bottom of pageq: quit
touch: Craete new file or update time stamp of existing fileexit: Exits the shell or your current session.clear: Clears the screen.- Ask commands for help with
--helpor-h
Environment Variables
- For example,
$PATHcontrols your search pathecho $PATH: view content of \$PATH variable
- To execute commands outside of \$PATH:
/full/path/to/command./command-in-this-dir
which cat: locate the commandcat
Working with Directories
- Directories Shortcuts
.This directory..The parent directorycd -Change to the previous directorypwdShow present working directory
echo $OLDPWD: view directory you pervious end- Create and Remove Directories
mkdir [-p] directory- use
-pto create multiple directories
- use
rmdir [-p] directory- Only remove empty directories
rm -rf directory- Recursively removes directories
Listing Files ('ls' command)
ls -l: Show long listing format-rw-rw-r-- 1 jason users 10400 Sep 27 08:52 sales.data- Permissions: -rw-rw-r--
- Number of links: 1
- Owner name: jason
- Group name: users
- Number of bytes in the file: 10400
- Last modification time: Sep 27 08:52
- File name: sales.data
ls -a: Show hidden files- Hidden files are not displayed by default
- Hidden files begins with a period
. - Sometimes called "dot files"
- Command options can be combined
ls -l -ais the same asls -laandls -al
ls -F: Show file types (at the end)/: Directory@: Link*: Executable
ls -t: List file by timels -r: Reverse orderls -latr: Long listing including all files reverse sorted by timels -R: List files recursively- The tree command is similar to ls -R but creates visual output. The command may not be installed by default
tree -d: List directories onlytree -C: Colorize output
- The tree command is similar to ls -R but creates visual output. The command may not be installed by default
ls --color: Colorize the output
Working with Spaces in Names
- Just say no to spaces!
- Alternatives:
- Hyphens
- - Underscore
_ - CamelCase
- Hyphens
- Encapsulate the entire file name in quotes
ls -l "my notes.txt"orls -l 'my notes.txt'
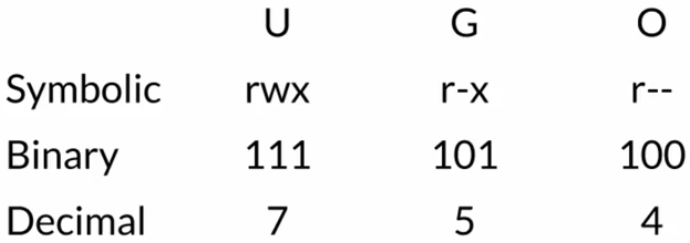
File & Directory Permissions
Type
$ls -l-rw-rw-r-- 1 jason users 10400 Sep 27 08:52 sales.data
| Symbol | Type |
|---|---|
| - | Regular file |
| d | Directory |
| \ | Symbolic link |
| r | Read |
| w | Write |
| x | Execute |
- Permissions - File vs Directories
- Permissions on a directory can effect the files in the directory
- If the file permission looks correct, start checking directory permissions
- Work you way up to the root
| Permission | File | Directory |
|---|---|---|
| Read (r) | Allows a file to be read. | Allows file names in the directory to be read. |
| Write (w) | Allows a file to modified. | Allows entries to be modified within the directory. |
| Execute (x) | Allows the execution of a file | Allows access to contents and metadata for entries. |
Permission Categories
u: Userg: Groupo: Othera: All
Groups
- Every user is in at least one group.
- Users can belong to many groups.
- Groups are used to organize users.
- The
groups [userId]command displays a user’s groups. - You can also use
id -Gn

Changing Permissions
chmod: Change mode (permission) commandchmod g+w sales.datachmod g-w sales.datachmod g+wx sales.datachmod u+rwx, g-x sales.datachmod a=r sales.datachmod u=rwx, g=rx, o= sales.data- Remove all permissions from others
- ugoa: User category
- user, group, other, all
- +-=: Add, subtract or set permissions
- rwx: Read, Write, Execute
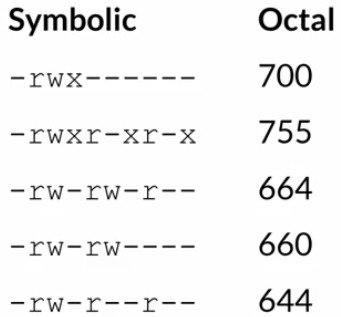
Numeric Based Permissions
| r | w | x | |
|---|---|---|---|
| 0 | 0 | 0 | Value for off |
| 1 | 1 | 1 | Binary value for on |
| 4 | 2 | 1 | Base 10 value for on |

- Order has meaning
- For example,
chmod 754 sales.data
- For example,
- Commonly Used Permissions
- Avoid using
666or777
- Avoid using
Working with Groups
- When you create a file, new file belong to your primary group
- The
chgrpcommand changes the groupchgrp sales sales.data
File Creation Mask
- File creation mask determines default permissions.
- If no mask were used permissions would be:
777for directories666for files
The umask Command
- Turns off/ takes away permissions
- Syntax:
umask [-S] [mode]-S: return symbolic notationumask -Sreturnsu=rwx, g=rx, o=rxfor.
mode: octal value '755', '664' etc
Octal subtraction
- Note: it's just an estimate
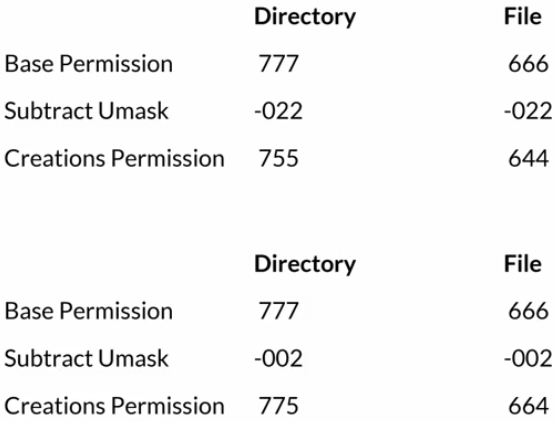
- Note: it's just an estimate
Common umask modes
022002077007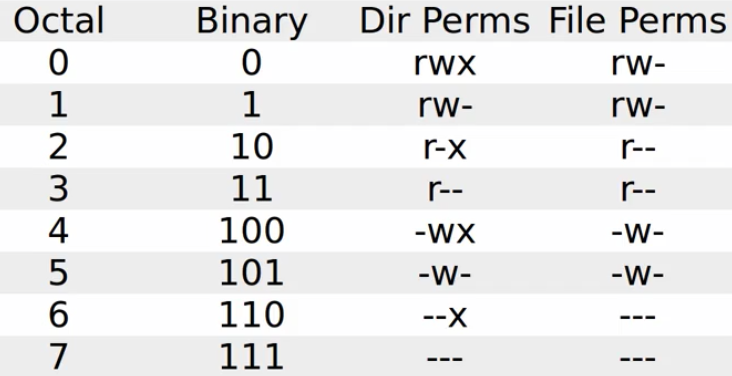
- Special Modes
- If you run
umaskwithout any arguments, it will display the mode in 4 characters instead of the 3 that we're working with:umaskreturns0022(same as umask 022)
- The additional character is the special modes:
- setuid
- setgid
- sticky
- These speical modes are not coverd in this course
- If you run
View Files & the Nano Editor
Displaying Contents of Static Files
cat file: Display the contents of file.more file: Browse through a text file.less file: More features thanmore(less is more).head file: Output the beginning (or top) portion of file.- Displays only 10 lines by default
- Change this behavior with
-ne.g.head -15 file.txt
tail file: Output the ending (or bottom) portion of file.- Displays only 10 lines by default
- Change this behavior with
-ne.g.tail -15 file.txt
Viewing Files in Real Time
tail -f file: Displays data as it is being written to the file e.g. log file
Nano Editor
- Nano is a simple editor.
- Easy to to learn.
- Not as advanced as vi or emacs.
- If nano isn't available, look for pico.
nano file.txt
Editing Files in Vi
- Has advanced and powerful features
- Not intuitive
- Harder to learn than nano
- Requires a time investment
vi [file]: Edit filevim [file]: Same as vi, but more features- 'vim' stands for vi improved with syntax highlighting and ability to edit file over the network
- On many linux distributions, when you type 'vi', you're actually running 'vim'
view [file]: Starts vim in read-only mode- Advantages on using vi:
- Always available on a Linux system
- Once you learn the key mapping on vi, you can apply them to other commands, like 'man', 'more', 'less', 'view' or edit shell commands
- Vi has 3 modes:
| Mode | Key |
|---|---|
| Command | Esc |
| Insert | iIaA |
| Line | : |
Vi Command Mode and Navigation
- When vi starts, it's in command mode
- The other 2 modes: Insert and Line modes
- To get back to command mode, hit the
esckey - Navigation keys:
k: Up one line.j: Down one line.h: Left one character.l: Right one character.
w: Right one word.b: Left one word.^Go to the beginning of the line.$: Go to the end of the line.
Vi Insert Mode
- To use vi Insert Mode, use either one of the 4 keys below:
i: Insert at the cursor position.I: Insert at the beginning of the line.a: Append after the cursor position.A: Append at the end of the line.
- To use vi Insert Mode, use either one of the 4 keys below:
Vi Line Mode
- To use vi Line Mode, type colon
::w: Writes (saves) the file.:w!: Forces the file to be saved.:q: Quit.:q!: Quit without saving changes.:wq!: Write and quit.:x: Same as:wq.:n: Positions the cursor at line n.:15: Go to line 15 of the file
:$: Positions the cursor on the last line.:set nu: Turn on line numbering.:set nonu: Turn off line numbering.:help [subcommand]Get help.
- To use vi Line Mode, type colon
Vi Repeating Commands
- Repeat a command by preceding it with a number.
5k: Move up a line 5 times80i<Text><ESC>: Insert80 times 80i_<Esc>: Insert 80 "_" characters
- Repeat a command by preceding it with a number.
Vi Deleting Text
- In command mode
x: Delete a character.dw: Delete a word.dd: Delete a line.D: Delete the remaining text from the current position.
Vi Changing Text
r: Replace the current character.cw: Change the current word.cc: Change the current line.c$: Change the text from the current position.C: Same as c$.~: Reverses the case of a character.
Vi Copy and Paste
yy: Yank (copy) the current line.y<position>: Yank the. yw: Yank a wordy3w: Yank three words
p: Paste the most recent deleted or yanked text.
Vi Undo/ Redo
u: UndoCtrl-R: Redo
Vi Searching
/<pattern>: Start a forward search.?<pattern>: Start a reverse search.n: Go to the next matchN: Go to the previous match
Vi Tutor
vimtutor: VIM Tutor
Vi Cheat Sheet
Editing Files with Emacs
- Emacs is Powerful editor.
- Some people prefer vi, other emacs.
- Either are great editors.
- Use what feels comfortable to you.
- Emacs Keys:
- emacs [file]: Edit file.
- C-<char>:
Ctrlwhile pressing <char>. - M-<char>: "Meta" key (
altkey) while pressing <char>. - M-<char>:
Esc, then type
- Emacs Commands:
C-h: HelpC-x C-c: ExitC-x C-s: Save the fileC-h t: Built-in tutorialC-h k <key>: Describe key
Emacs Navigation:
C-p: Previous line.C-n: Next line.C-b: Backward one character.C-f: Forward one character.M-f: Forward one word.M-b: Backward one word.C-a: Go to the beginning of the line.C-e: Go to the end of the line.M-<: Go to the beginning of the file.M->: Go to the end of the file.
Emacs Deleting Text
C-d: Delete a character.M-d: Delete a word.
Emacs Copy & Paste, Undo
C-k: Kill (cut)C-y: Yank (paste)C-x u: Undo
Emacs Searching
C-s: Start a forward search.C-r: Start a reverse search.
Emacs Repeating Commands
C-u N <command>: Repeat <command> N times.
Emacs Cheat Sheet
Finding Files & Directories
The find Command
- Syntax:
find [path...] [expression] - Recursively finds files in path that match expression.
- Results are in real time
- If no arguments are supplied it find all files in the current directory (includes hidden files).
- Options:
-name pattern: Find files and directories that match 'pattern'.-iname pattern: Like '-name', but ignores case.-ls: Performs an 'ls' on each of the found items.-mtime days: Finds files that are 'days' old.-size num: Finds file that are of size 'num'.-newer file: Finds files that are newer than 'file'.-exec command {} \;: Run 'command' against all the files that are found.
- Examples:
find /bin -name *vfind . -mtime +10 -mtime -13: find files that are more than 10 days old but less than 13 days old in current directoryfind s* -lsfind . -size +1M: find files that are more than 1MB- 1K: 1 Kilobyte
- 1G: 1 Gigabyte
find . -type d -newer file.txt: find directories that are newer than 'file.txt'find . -exec file {} \;: excute 'file' command on all search result- The
filecommand tells you the file type
- The
- Syntax:
A Fast Find - Locate
- Syntax
locate pattern - Lists files that match pattern.
- Faster than the
findcommand. - Queries an index.
- Typically an index is re-build everyday
- Results are not in real time.
- May not be enabled on all systems.
- Syntax
Graphical Editors
- Various graphical editors exist for Linux.
- If you are running Linux in a desktop operating system
- Not available via SSH or terminal emulator applications
emacs: Emacs has a graphical mode too.gedit: The default text editor for Gnome.gvim: The graphical version of vim.kedit: The default text editor for the KDE.AbiWord: Microsoft Word alternative.LibreOffice: Full office suite.- Found under
Application > Office
- Found under
Kate: Source code editor.
- Graphical modes exist for emacs and vi.
- Found under
Applications > Accessories
- Found under
Deleting, Copying, Moving and Renaming Files
Removing Files
It's a good idea to use
lscommand to check file to be remove before acutally removing itrm file: Remove file.rm -r dir: Remove the directory and its contents recursively.rm -f file: Force removal and never prompt for confirmation.
Copying Files
cp source_file destination_file: Copy source_file to destination_file.cp src_file1 [src_fileN ...] dest_dir: Copy source_files to destination_directory.cp -i: Run in interactive mode.- With prompt to overwrite the file if same file exists in destination
cp -r source_directory destination: Copy src_directory recursively to destination.- If destination directory does not exist, it will create the new directory
Moving and Renaming Files
mv: Move or rename files and directories.mv source destinationmv -i source destination: Interactive mode
Sorting Data
sort file: Sort text in file.- Options:
-k F: Sort by key. F is the field number.sort -u -k2 more-secrets: sort by the second column in file 'more-secrets'
-r: Sort in reverse order.-u: Sort unique.- Removes duplicate lines and output unique results
Creating Archives (tar)
tar [-] c|x|t f tarfile [pattern]- Create, extract or list contents of a tar archive using pattern, if supplied.
- Unlike other commands,
tardoesn't need the hyphen-before options - Options:
c: Create a tar archive.x: Extract files from the archive.t: Display the table of contents (list).v: Be verbose.z: Use compression.f file: Use this file.
- Examples:
tar cf tps.tar tpsreportstar tf tps.tartar xf /home/test/tps.tar: extract filestar xvf /home/test/tps.tar: extract files in verbose
Compressing Files to Save Space
gzip: Compress files.- Add extension
.gzin the file name
- Add extension
gunzip: Uncompress files.gzcatorzcat: Concatenates compressed files.
Using gzip + tar
tar zcf test.tgz tpsreports: Compress tartar zcf test.tar.gz tpsreports: Compress tar- Note the naming convention
tgz,tar.gz
- Note the naming convention
tar ztvf tpsreports: View contents of gzip files
- Disk Usage
du: Estimates file usage.du -k: Display sizes in Kilobytes.du -h: Display sizes in human readable format.
Wildcards
- A character or string used for pattern matching.
- Globbing expands the wildcard pattern into a list of files and/or directories (paths)
- Wildcards can be used with most commands.
lsrmcp
*: matches zero or more characters.?: matches exactly one character.[]: A character class.- Matches any of the characters included between the brackets. Matches exactly one character.
[aeiou]: start with a vowelca[nt]*- can
- cat
- candy
- catch
[!]: Matches any of the characters NOT included between the brackets. Matches exactly one character.[!aeiou]*: NOT starts with a vowel- baseball
- cricket
Wildcards Ranges
- Use two characters separated by a hyphen
-to create a range in a character class.[a-g]*- Matches all files that start with a, b, c, d, e, f, or g.
[3-6]*- Matches all files that start with 3, 4, 5 or 6.
Predefined named character classes
[[:alpha:]]: Matches alphabetical letters (upper and lower cases letters)[[:alnum:]]: Matches alpha numeric characters[[:digit:]]ls *[[:digit:]]: find files that end with a digit
[[:lower:]][[:space:]]: Matches spaces, tabs, new line characters[[:upper:]]
- Use two characters separated by a hyphen
Matching Wildcard Patterns
\: escape character. Use if you want to match a wildcard character.- Match all files that end with a question mark:
*\?- found 'done?'
Input, Output (I/O) and Redirection
| I/O Name | Abbreviation | File Descriptor |
|---|---|---|
| Standard Input | stdin | 0 |
| Standard Output | stdout | 1 |
| Standard Error | stderr | 2 |
- stderr: 'ls: cannot access not-here: No such file or directory'
- stdout: 'files.txt'
Redirection
>: Redirects standard output to a file.- Overwrites (truncating) existing contents.
ls -l 1> files.txtis the same asls -l > files.txt
>>: Redirects standard output to a file.- Appends to any existing contents.
<: Redirects input from a file to a command.sort < files.txt- equivalent to
sort files.txt
- equivalent to
&: Used with redirection to signal that a file descriptor is being used.2>&1: Combine stderr and standard output.2>file: Redirect standard error to a file.sort < files.txt > sorted_files.txt
The Null Device
- The null device is a special file that throws away whatever is fed to it (aka 'bit bucket')
>/dev/null: Redirect output to nowhere.ls 2> /dev/null: Redirect stderr to nowhere (not display on screen)ls here not-here > /dev/null 2>&1: Append stderr to stdoutput
Comparing Files
Comparing the Contents of the Files
diff file1 file2: Compare two files.sdiff file1 file2: Side-by-side comparison.vimdiff file1 file2: Highlight differences in vim.
diff Output
- In the example below, the third line of the first file is different than the third line in the second file
- Ouput Syntax:
LineNumFile1-Action-LineNumFile2- Action = (A)dd/ (C)hange/ (D)elete
 $diff file1 file2
 3c3

 < this is a line from file1
 ---
 > This is a line from file2
sdiff Output
$ sdiff file1 file2 line in file1 | line in file2 > more in file2|: Differing lines<: Line from file 1 (only exist in file 1)>: Line from file 2 (only exist in file 2)
vimdiff
Ctrl-w w: Switch between windows:q: Quit (close current window):qa: Quit all (close both files):qa!: Force quit all
Searching in Files and Using Pipes
The grep Command
grep: Display lines matching a pattern which is case sensitive.- Syntax:
grep pattern [file]- If file is omitted, grep will use the standard input (see section 'Pipes' below)
- Syntax:
- Options
-i: Perform a search, ignoring case.-c: Count the number of occurrences in a file.-n: Precede output with line numbers.-v: Invert Match. Print lines that don’t match.
The file Command
file [file_name]: Display the file type of 'file_name'.
$ file sales.data
sales.data: ASCII text

$ file *
bin: directory
jason.tar: POSIX tar archive
Searching for Text in Binary Files
strings: Display printable strings
Pipes
- You can chain two commands together with a pipe
| - Pipe takes the standard output from the preceding command and passes it as the standard input to the following command
- Syntax:
command-output | command-input - Example:
cat file | grep pattern- same as
grep pattern file
- same as
strings giant-steps.mp3 | grep -i john | head -1strings giant-steps.mp3 | grep -i john | head -1 | cut -d' ' -f2
- You can chain two commands together with a pipe
The cut command
cut [file]: Cut out selected portions of file. If file is omitted, use standard input.- Options:
-d delimiter: Use delimiter as the field separator.-f N: Display the Nth field.
Searching and Pipe Example
- Find all users named "bob" in /etc/passwd.
/etc/passwdcontains all accounts in a Linux systemgrep bob /etc/passwd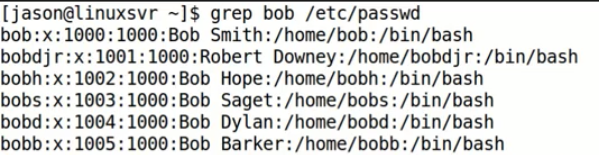
- Print account name and real name.
grep bob /etc/passwd | cut -d: -f1,5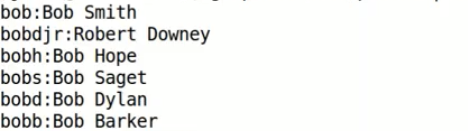
- Print in alphabetical order by account name.
grep bob /etc/passwd | cut -d: -f1,5| sort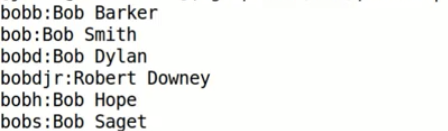
- Print in a tabular format.
grep bob /etc/passwd | cut -d: -f1,5 | sort | tr ":" " "
tr "char1" "char2": Translate a character into another character
grep bob /etc/passwd | cut -d: -f1,5 | sort | tr ":" " " | column -t
column -t: Format output in table format
- Find all users named "bob" in /etc/passwd.
Piping Output to a Pager
- more
- less
cat /etc/passwd | less- same as
less /etc/passwd
- same as
Transferring and Copying Files over the Network
Copying Files over the Network
SCP- Secure copySFTP- SSH file transfer protocol
Command Line SCP Clients
- scp
- sftp
- PuTTY Secure Copy client - pscp.exe (Windows)
- PuTTY Secure File Transfer client - psftp.exe (Windows)
Graphical SCP/SFTP Clients
- Cyberduck
- FileZilla
- WinSCP
scp / sftp command line utilities
scp source destination: Copy source to destination.sftp host: Start a secure file transfer session with host.sftp jason@host
ftp Command Line Utility
ftp host: Start a file transfer session with host.- FTP is not a secure transfer protocol like SCP and SFTP, use SCP or SFTP over FTP when possible
Example: SFTP
sftp linuxsvr: Connect to serverpwd: When you connect to the remote server, you're placed into your home directory- Precede commands with a
l, that's for locallpwdlls: Show what files are on the local box
put z.txt: Upload file to remote serverquit: Disconnect from remote server
Example: SCP
scp z.txt linuxsvr:/tmp/: Upload file to 'tmp' directory in the remote serverscp z.txt linuxsvr:~/: Upload file to remote home directoryssh linuxsvr: Connect to the remote serverscp z.txt adminuser@linuxsvr:/home/adminuser/: Transfer file to remote server as a different usersftp adminuser@linuxsvr: Connect to remote server
Customizing the Shell Prompt
- Use an environment variable to customize.
- Bash, ksh, and sh use
$PS1. - Csh, tcsh, and zsh use
$prompt.
- Bash, ksh, and sh use
- Customizing the Prompt with PS1
\d: Date in "Weekday Month Date" format "Tue May 26"\h: Hostname up to the first period\H: Hostname (full domain name)\n: Newline\t: Current time in 24-hour HH:MM:SS format\T: Current time in 12-hour HH:MM:SS format\@: Current time in 12-hour am/pm format\A: Current time in 24-hour HH:MM format\u: Username of the current user\w: Current working directory\W: Basename of the current working directory\$: If the effective UID is 0 (root), a#, otherwise a$
- Persist PS1 Changes
- Add the PS1 value to your personal initilization file aka 'dot file' e.g.
.bash_profile echo 'export PS1="[\u@\h \w]\$ "' >> ~/.bash_profilequit: Log outssh linuxsvr: Log back in
- Add the PS1 value to your personal initilization file aka 'dot file' e.g.
- Examples:
echo $PS1: Check the current prompt stringPS1="\u@\h \$": Customize prompt string- Ouput:
cabox@box-codeanywhere$
- Ouput:
PS1="<\t \u@\h \w>\$"- Ouput:
<10:30:16 cabox@box-codeanywhere ~/workspace>$
- Ouput:
cd /var/logPS1="\d \t \h \W>\$"- Output:
Sun Feb 23 09:23:51 linuxsvr log>$
- Output:
- Use an environment variable to customize.
Shell Aliases
- Shortcuts used for long commands andfor commands you type often
- Creating Aliases
- Syntax:
alias [name[=value]]alias: List aliases set- Use
name=valueto create new alias
- Syntax:
- Fix Typos
alias grpe='grep'
- Make Linux behave like another OS.
alias cls='clear'
- Removing Aliases
unalias name: Remove the “name” alias.unalias -a: Remove all aliases
- Persisting Aliases
- Add aliases to your personal initialization files e.g.
.bash_profile
- Add aliases to your personal initialization files e.g.
- Examples
alias ll='ls -l'
Environment Variables
- An environment variable is a storage location that has a name and a value
- Environment variables are uppercase by convention
Can change how an application behaves
- See "Environment" section in
manpages
- See "Environment" section in
Viewing Environment Variables
printenv: Print all or part of environment.printenv HOME: Print the HOME variableecho $ENV_VAR: Print the ENV_VAR variable.- Need to prepend
$when usingecho
- Need to prepend
Creating Environment Variables
- Syntax:
export VAR="value" - Example:
export EDITOR="vi"export TZ="US/Pacific"
- Syntax:
Removing Environment Variables
- Syntax:
unset VAR - Example:
unset TZ
- Syntax:
Persisting Environment Variables
- Add to your personal initialization files e.g.
.bash_profile
- Add to your personal initialization files e.g.
Common Environment Variables
EDITOR: Program to run to perform editsHOME: Home directory of the user.LOGNAME: The login name of the user.MAIL: The location of the user’s local inbox.OLDPWD: The previous working directory.PATH: A list of directories to search for commands.PAGER: Program used to paginate through files.PS1: The primary prompt string.PWD: Present working directory.USER: The username of the current user.
Processes and Job Control
Listing Processes and Information
ps: Display process status.- Options:
-e: Everything, all processes.-f: Full format listing.-u username: Display username’s processes.-p pid: Display information for PID.
- Common ps Commands:
ps -e: Display all processes.ps -ef: Display all processes, full.ps -eH: Display a process tree.ps -e --forest: Display a process tree.ps -u username: Display user’s processes.
Other ways to view processes
pstree: Display processes in a tree format.top: Interactive process viewer.htop: Interactive process viewer.
Background and Foreground Processes
- When a command, process, or program is running in the foreground, the shell prompt will not be displayed until that process exits
command &: Start command in background.Ctrl-c: Kill the foreground process.Ctrl-z: Suspend the foreground process.bg [%num]: Background a suspended process.- If no parameter,
bgwill operate on current job i.e. the last job that was stopped while it was in the foreground, or the last job that was started in the background - The current job can be referred to by
%%or%+ - The previous job can be refered to by
%-
- If no parameter,
fg [%num]: Foreground a background process.kill [%num]: Kill a process by job number or PID.jobs [%num]: List jobs.- If not parameter, list all jobs
- Examples
jobs %%: List current jobjobs %+: List current job
- Killing Processes
Ctrl-c: Kills the foreground proc.kill [-sig] pid: Send a signal to a process.- The default signal used by kill is termination ('TERM')
- The signal number of 'TERM' is 15 and 'KILL' is 9
- Examples:
kill 123kill -15 123kill -TERM 123- if
-TERMcan't kill, usekill -9 123
kill -lDisplay a list of signals.
Scheduling Repeated Jobs with Cron
Cron & Crontab
- The
cronservice runs scheduled jobs - Use the
crontabcommand to schedule jobs
- The
Crontab Format
- A Crontab or Crontable is a configuration file that specifies when commands are to be executed by Cron
- Each line in a Crontab represents a job and contains two pieces of infomation:
- When to run
- What to run
* * * * * command
| | | | |
| | | | +-- Day of the Week   (0-6)
| | | +---- Month of the Year (1-12)
| | +------ Day of the Month  (1-31)
| +-------- Hour (0-23)
+---------- Minute (0-59)
Redirecting Output
0 2 * * * /root/backupdb > /tmp/db.log 2>&1: Run at 02:00 every day and send output to a log file.
Example Crontab Entry:
0 7 * * 1 /opt/sales/bin/weekly-report: Run every Monday at 07:00.0,30 * * * * /opt/acme/bin/half-hour-check: Run every 30 minutes.*/2 * * * * /opt/acme/bin/half-hour-check: Another way to do the same thing.0-4 * * * * /opt/acme/bin/first-five-mins: Run for the first 5 minutes of the hour (run 5 times every hour)
Crontab Shortcuts
- This may or may not work on your Linux distribution. Use
man cronto check if this works for you @yearly0 0 1 1 *- at midnight on the morning of Jan 1
@annually0 0 1 1 *- same as
@yearly
- same as
@monthly0 0 1 * *- at midnight on the morning of the first day of the month
@weekly0 0 0- at midnight on the morning of Sunday
@daily0 0 * * *- at midnight
@midnight0 0 * * *- same as
@daily
- same as
@hourly0 * * * *
- This may or may not work on your Linux distribution. Use
Using the Crontab Command
- The
crontabcommand manipulates cron jobs crontab file: Install a new crontab from file.crontab -l: List your cron jobs.crontab -e: Edit your cron jobs.- Will invoke the editor that's specified in the 'EDITOR' environment variable
crontab -r: Remove all of your cron jobs.
- The
Switching Users and Running Commands as Others
The su Command
su [username]: Switch user- If no arguments supplied, su assumes you try to become a superuser (root)
su Options
-: A hyphen is used to provide an environment similar to what the user would expect had the user logged in directly.- For example, environment variable 'TEST' created by userA will not be available to userB using the
su - userBoption
- For example, environment variable 'TEST' created by userA will not be available to userB using the
-c command: Specify a command to be executed.su -c 'echo '$ORACLE_HOME' - oracle
Who Am I?
whoami: Displays your account name.- Example:
$whoami
jason
$ su oracle
Password:
$ whoami
oracle
$- Sudo - Super User Do
sudo: Execute a command as another user, typically the superuser.- One of the advantages of using
sudoover thesucommand is that you don't need to know the password of the other user. If the sudo configuration permits access, that command is executed - Using sudo:
sudo -l: List available commands.sudo command: Run command as root.sudo -u root command: Same assudo command.sudo -u user command: Run as user.sudo su: Switch to the superuser account.sudo su -: Switch to the superuser account with root’s environment.sudo su - username: Switch to the username account.sudo -s: Start a shellsudo -u root -s: Same assudo -ssudo -u user -s: Start a shell as user
- Changing the sudo Coniguration
visudo: Edit the/etc/sudoersfile- Requires root privileges to run
- Sudoers Format
- Syntax:
user host=(users) [NOPASSWD:]commands - Examples:
adminuser ALL=(ALL) NOPASSWD:ALLjason linuxsvr=(root) /etc/init.d/oracle
- Syntax:
Shell History and Autocompletion
Shell History
- Executed commands are added to the history
- Shell history can be displayed and recalled
- Shell history is stored in memory and on disk (on exit)
- History files are stored in 'home' directory:
~/.bash_history~/.history~/.histfile
- History files are stored in 'home' directory:
history Command
history: Display the shell history.HISTSIZE: Controls the number of commands to retain in history.- By default, bash retains 500 commands in your shell history
export HISTSIZE=1000: Increase history size- Place that in your personal initialization file
! Syntax
!num: Repeat command line number 'num'.- Use
historyto view the line number !is called "bang"
- Use
!!: Repeat the previous command line.- Also called "bang bang"
!string: Repeat the most recent command starting with "string."!^: Represents the first argument!^=!:1
!$: Represents the last argumentPulling Out Words from Previous Command
- Syntax:
!:num <Event> <Separator> <Word>!: Represents a command line (or event).!: The most recent command line!=!!
:num: Represents a word on the command line0: command1: first argument, etc.
- Examples
- Syntax:
$ head files.txt sorted_files.txt notes.txt
<output from head command here>

$ !!
head files.txt sorted_files.txt notes.txt
<output from head command here>

$vi !:2
vi sorted_files.txt
<vi editor starts>

$ls !^
ls files.txt
<output from ls here>

$ls !$
ls notes.txt
<output from ls here>
Searching Shell History
Ctrl-r: Reverse shell history search- Press
Ctrl-ragain to get to next match
- Press
Enter: Execute the commandArrows: Change the commandCtrl-g: Cancel the search
Auto Completion
Tab: Perform auto completionTab+Tab: View all the possible completion options- Works on files, directories, paths, environment variables, usernames(~)
ls -ld ~: list current user home directoryls -ld ~adm: list user home directory starts with 'adm'- Output: ~adm ~adminuser/
Installing and Managing Software
Package
- A package is a collection of files that makes up an application
- A package contains Data / Metadata such as:
- Package description
- Version
- Dependencies
Package Manager
- Installs, upgrades, and removes packages
- Manages dependencies
- Keeps track of what is installed
- Installing or removing package requires root priviledges
- Use
sudoorsuto the "root" user ifsudois not configured
- Use
Installing Software on RPM Distros
RPMstands for "Redhat Package Manager"- RedHat
- CentOS
- Fedora
- Oracle Linux
- Scientific Linux
- yum
- The
yumcommand line utility is a package management progrm for those Linux distributions that use RPM packages yum search string: Search for package containing 'string'yum info [package]: Display infoyum install [-y] package: Install package- Use
-yto automatically reply 'yes' to yum's questions
- Use
yum remove package: Remove package
- The
- rpm
rpm -qa: List all installed packages.rpm -qf /path/to/file: List the file’s package.rpm -ql package: List package’s files.rpm -ivh package.rpm: Install package.rpm -e package: Erase (uninstall) package.
Installing Software on DEB Distros
DEBstands for "Debian"- Debian
- Linux Mint
- Ubuntu
- APT
APTstands for "Advanced Packaging Tool"apt-cache search string: Search for package with 'string'.apt-get install [-y] package: Install package.- Use
-yto automatically reply 'yes' to apt-get's questions
- Use
apt-get remove package: Remove package, leaving configuration.apt-get purge package: Remove package, deleting configuration.apt-cache show package: Display information about package.
- dpkg
dpkg -l: List installed packages.dpkg -S /path/to/file: List file’s package.dpkg -L package: List all files in package.dpkg -i package.deb: Install package.
Addendum: Connecting to a Linux Virtual Machine (VM) over the Network
- Stops any VM that is running
Make sure that the network adaptor is set to "Bridged"

Starts the VM
Make sure that a
ssh-serveris installed and runningps -ef | grep sshd: Check process table and search for SSH daemon / SSH server processThe results show that
sshdis not running
Check if
ssh-serveris installed- DEB:
dkpg -l | grep ssh-server - RPM:
rpm -qa | grep ssh-server
- DEB:
If not found, install
ssh-server- DEB:
sudo apt-get updatesudo apt-get install openssh-server openssh-clientopenssh-clientis used to connect to other system from this system
- RPM:
sudo yum install openssh-server openssh-client
- DEB:
Look at the process table and check for
sshd, make sure it's runningps -ef | grep sshdYou can see that it's up and running

If not running, use
- DEB:
sudo service ssh start - RPM:
sudo service sshd start
- DEB:
Get the IP address of this VM
/sbin/ip addrNote there are 2 network interfaces
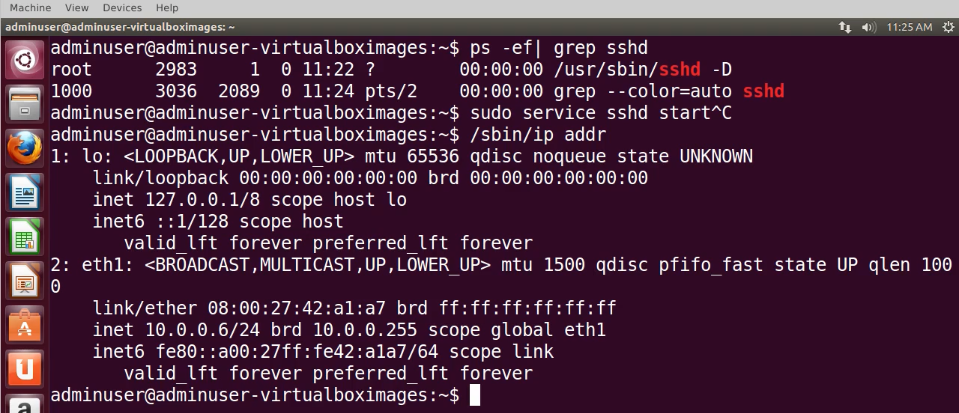
- The 1st network interface is a virtual network interface that will be present on all systems.
- Called the
loopback devicewhich allows the system to communicate with itself - Always has an ip address of
127.0.0.1 - Use the ip address
10.0.0.6in the 2nd network interface
Confirm username
whoami- For security reason, SSH access is usually disabled for the root user. If so, use other username to connect instead
Connect to VM using Terminal
- From Linux & Mac
ssh adminuser@10.0.0.6: Login VMexit: Exit VM
- From Windows
putty: Starts putty
- From Linux & Mac