Property Binding
// File: courses.component.ts
import { Component } from '@angular/core';

@Component({
  selector: 'courses',
  template: `
    <h2>{{ title }}</h2>
    <img src = "{{ imageUrl }}" />
  `
})

export class CoursesComponent {
  title = "List of courses";
  imageUrl = "http://lorempixel.com/400/200";
}
- When Angular compiles our templates, it translates string interpolations into what we call
property bindingin which a property is binded to a TypeScript class
// Interpolation
<h2>{{title}}</h2>
- In property binding, Angular bind a property of a DOM element such as
srcto a field of our componentimageUrl - The string interpolation syntax will be tranlated to the square bracket syntax as follow:
// Property Binding
<h2 [textContent] = "title"></h2>
Another exmaple:
- Note that we add
/for self-closing tag e.g. <img>
// Interpolation
<img src="{{imageUrl}}" />

// Property Binding
<img [src]="imageUrl" />
Property bindingworks only one way: from component to the DOM. Any changes in the DOM are NOT reflected back in a component- For example if you have a input field and the user types something in the input field, the underlying property or field in the component will not be updated
// Attribute Binding
[colspan] = "colSpan"
import { Component } from '@angular/core';

@Component({
  selector: 'courses',
  template: `
    <img alt="img" [src] = "imageUrl" />
    <table>
      <tr>
        <td [colspan]="colSpan"></td>
      </tr>
    </table>
  `
})

export class CoursesComponent {
  imageUrl = "";
  colSpan = 2;
}
Upon compilation, note the error in the console:
`Can't bind to 'colspan' since it isn't a known property of 'td'
In order to understand this error, first you need to understand the difference between DOM (Document Object Model) and HTML
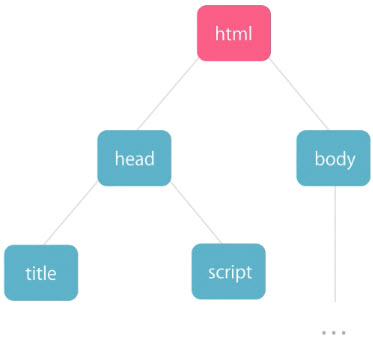
DOM is a model of objects that represent the structure of a document. It's essentially a tree of objects in memory.
HTML is a markup language that we use to represent DOM in text. When your browser parses an HTML document, it creates a tree of objects in memory that they refer to as a DOM.
We can also create this tree of objects programmatically using vanilla JavaScript. We don't neccessarily need HTML but HTML is far simpler.
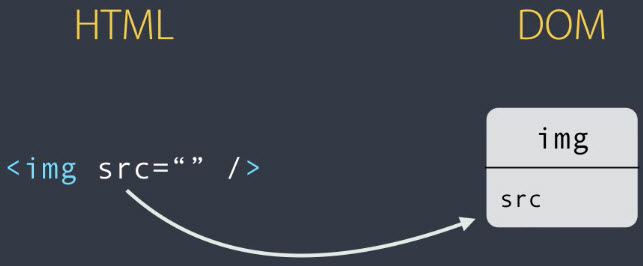
Most of the attributes of HTML elements have a one-to-one mapping to properties of DOM objects. There are however a few exceptions. For example, we have HTML attributes that don't have a respresentation in the DOM e.g. The DOM object does not have a property called colspan. That's why we can the error.
On the other hand, we have properties in DOM that do not have a representation in HTML e.g. HTML does not have an attribute called textContent
<h1 [textContent]="title"></h1>
Using attr.
- 99% of time we don't need to use this
- To bind the attribute of the <td> element, add a prefix
attr.which tells Angular that we're targeting thecolspanattribute of a HTML element
<td [attr.colspan]="colSpan"></td>
Adding Twitter Bootstrap
Step 1: Install Bootstrap
Open the terminal and type
npm install bootstrap@3.3.7 --save- download
bootstrapand store it intonode_modulesfolder --savewill add bootstrap as a dependency inpackage.json
- download
The meaning of the line
"bootstrap":"^3.3.7"- 3.3.7: "major" number, minor number and path number
^: we can use the most recent "major" version e.g. 3.4, 3.5, 3.9 but if there is a newer version, like version 4 or 5, don't install that
Benefit of Adding an Entry Package in package.json
By listing all the dependencies in package.json, anyone who checks out this source code from a repository can simply go to the terminal and type npm install. NPM looks at the package.json and downloads all the dependencies to the machine
Step 2: Import Bootstrap StyleSheet
- Open
angular-cli.json, add the following: - Source: https://stackoverflow.com/questions/43557321/angular-4-how-to-include-bootstrap
"styles": [
   "../node_modules/bootstrap/dist/css/bootstrap.min.css",
   "styles.css"
],
- This method does NOT Work
- Open file
src/style.css - Use CSS style
@importand add the path ofbootstrap.cssrelative fromnode_modulesfolder
- Open file
@import "~bootstrap/dist/css/bootstrap.css";
Step 3: Add Bootstrap Element
- Open file
courses.component.tsand add a <button>:
import { Component } from '@angular/core';

@Component({
  selector: 'courses',
  template: `
    <button class="btn btn-primary">Save</button>
  `
})

export class CoursesComponent {
}
Step 4: Modify Style
- Go to
style.cssand add the following:
body {
  padding: 20px;
}
Class Binding
- There are times that you may want to add class to an element, based on some condition
- For example, we want to apply the active class on the <button> based on the state of the underlying component
- To bind the TypeScript
isActivefield to DOM propertyclass.active:
// Class Binding
[class.active] = "isActive"
// File: courses.component.ts
import { Component } from '@angular/core';

@Component({
  selector: 'courses',
  template: `
    <button class="btn btn-primary" [class.active]="isActive">Save</button>
  `
})

export class CoursesComponent {
  isActive = true;
}
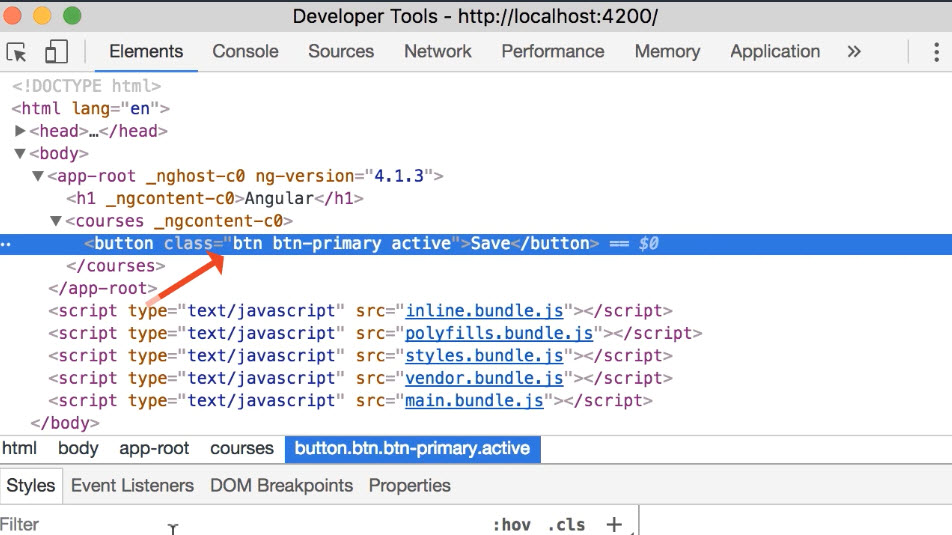
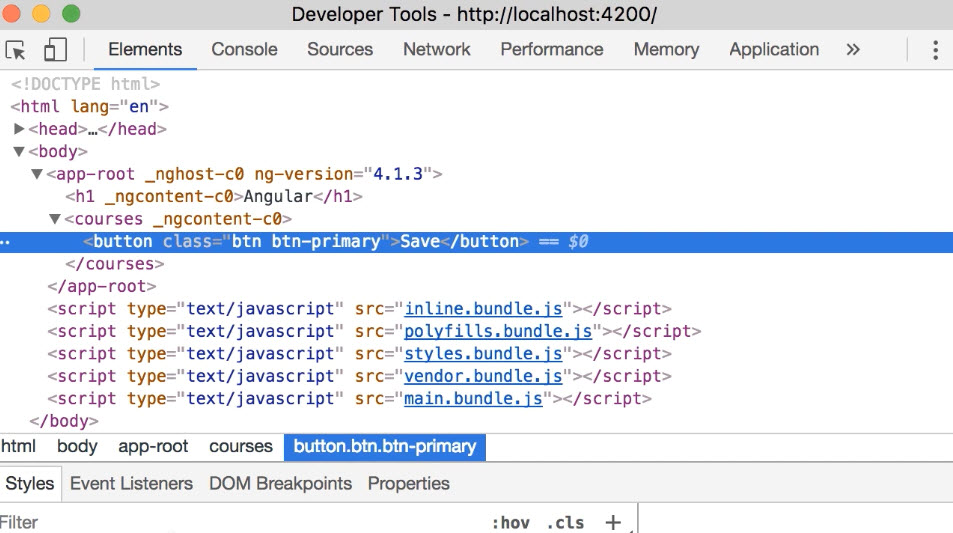
- From the console, notice we have 3 classes
- If
isActiveistrue, the target class will be added to the element
- If
isActiveisfalseandclass.activeexists in the element, the target class will be removed
Style Binding
- A variation of property binding and very similar to class binding
// Style Binding
<button [style.backgroundColor]="isActive? 'blue': 'white'">Save</button>
// File: courses.component.ts

import { Component } from '@angular/core';

@Component({
  selector: 'courses',
  template: `
    <button [style.backgroundColor]="isActive? 'blue': 'white'">Save</button>
  `
})

export class CoursesComponent {
  isActive = false;
}
- For a complete list of properties of the
styleobject in DOM:
Event Binding
- Handle events raised from the DOM, like keystrokes, mouse movements, clicks and so on
- Note the use of brackets
()instead of squared boxes[]
// Event Binding
<button (click)="onSave()">Save</button>
- Get access to the
event objectthat was raised in the event handler. For example with mouse movements, the event object will tell us the x and y poisitions - Use
$eventto represent aDOM event
import { Component } from '@angular/core';

@Component({
  selector: 'courses',
  template: `
    <button (click)="onSave($event)">Save</button>
  `
})

export class CoursesComponent {
  isActive = false;

  onSave($event){
    console.log("Button was clicked", $event);
  }
}
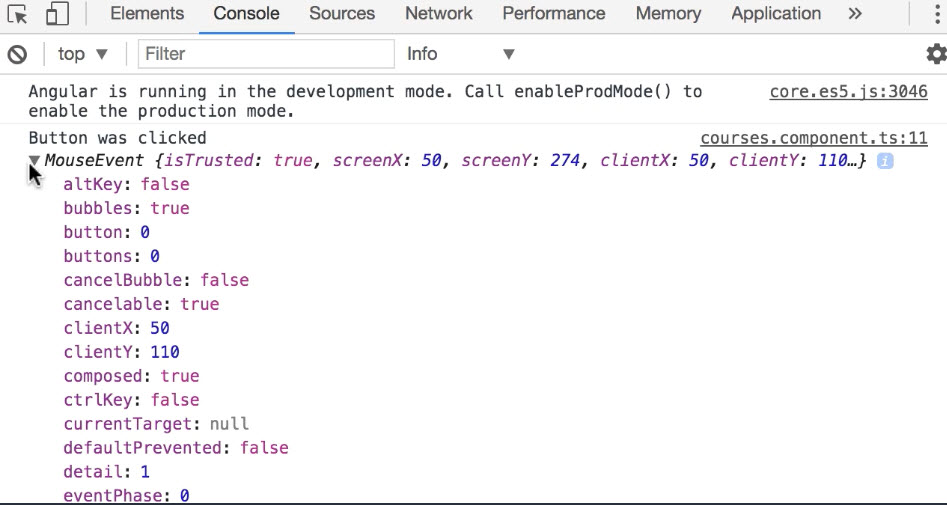
- We can view the properties of the DOM event object via the console:
Event Bubbling
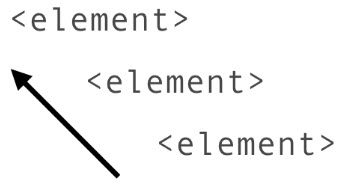
- Event bubbling is the standard event propagation mechanism in DOM
- An event bubbles up the DOM tree
- unless a handler of the event prevents further bubbling
- Let's add a <div> around <button>
import { Component } from '@angular/core';

@Component({
  selector: 'courses',
  template: `
    <div (click)="onDivClicked()">
      <button (click)="onSave($event)">Save</button>
    </div>
  `
})

export class CoursesComponent {
  isActive = false;

  onDivClicked(){
    console.log("div was clicked");
  }

  onSave($event){
    console.log("Button was clicked", $event);
  }
}
- When we click the button, we get two messages in the console:
- The first message is the handler of the click event of the <button>
- The second one is from the handler of the click efvent of the <div>

- We can stop
event bubblingby using the standard method in vanilla JavaScript:
// Stop Event Bubbling
$event.stopPropagation();
@Component({
  selector: 'courses',
  template: `
    <div (click)="onDivClicked()">
      <button (click)="onSave($event)">Save</button>
    </div>
  `
})

export class CoursesComponent {
  isActive = false;

  onDivClicked(){
    console.log("div was clicked");
  }

  onSave($event){
    $event.stopPropagation();

    console.log("Button was clicked", $event);
  }
}
- When we call this, this event will not bubble up, in other words, it's not going to hit the second handler

Event Filtering
- Let's say we want to handle the keyUp event
// Vanilla JS

@Component({
  selector: 'courses',
  template: `
    <input (keyup)="onKeyUp($event)" />
  `
})

export class CoursesComponent {
  onKeyUp($event){
    if ($event.keyCode == 13) console.log("Enter was pressed");
  }
}
In Angular, we have a better way to implement the exact same feature by applying a filter when handling an event
// Angular version

@Component({
  selector: 'courses',
  template: `
    <input (keyup.enter)="onKeyUp()" />
  `
})

export class CoursesComponent {
  onKeyUp(){
    console.log("Enter was pressed");
  }
}
Template Variables
- Let's say we want to get the value that was typed in the <input> field
- One way is to use the event object
// Vanilla JS
// Get value of input

@Component({
  selector: 'courses',
  template: `
    <input (keyup.enter)="onKeyUp($event)" />
  `
})

export class CoursesComponent {
  onKeyUp($event){
    console.log($event.target.value);
  }
}
Instead of passing the event object around, in Angular, we can declare a variable in our template that references this input field
#[variable name]
// Angular Template variable
// Get value of input

@Component({
  selector: 'courses',
  template: `
    <input #email (keyup.enter)="onKeyUp(email.value)" />
  `
})

export class CoursesComponent {
  onKeyUp(email){
    console.log(email);
  }
}
Two-way Binding
Using Variable vs. Using Object
- The passing of variable
emailin the previous section is a technique used inprocedural programmingwhich is not recommended - Using OOP, if the object has all the data we need, we don't have to pass parameters around because an object encapsulates some data and some behavior
- A better implementation using OOP will be as follow:
- Add properties
emailin class - So that Method
onKeyUp()don't need parameter
- Add properties
- Using OOP, our code will be cleaner and easier to read, understand and maintain
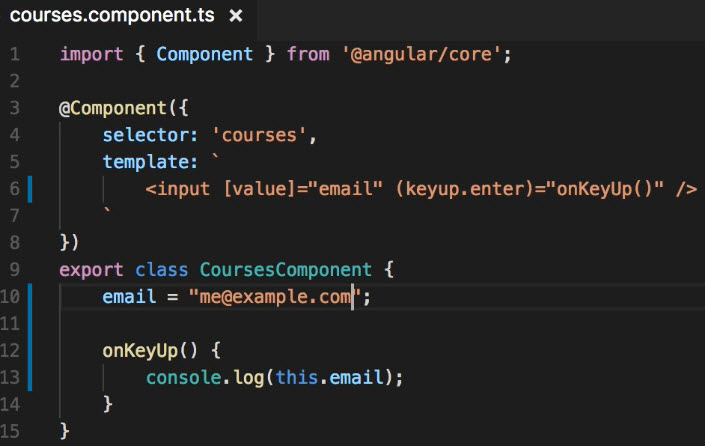
- As a refresher, an Angular component encapsulates the data, logic and the HTML markup behind the view so in this example:
emailproperty represents dataonKeyUp()represents behavior behind the viewtemplateproperty represents HTML markup
One-way Binding
- When we load this page, the input field should be with email address
me@example.com. However, after we changed the address tome@domain.com, in the console, we still gotme@example.com! Why?

- Because in
property binding, the direction of binding is from thecomponent to the view
Two-way Binding
- We want to type something in the input box (in the view) and the email field (in the component) to be updated
- In Angular, we have a special syntax kown as
banana in a box [()]for implementing two-way binding
Step 1: Bind to Directive "ngModel"
- Instead of binding a value, we bind with directive
ngModel ngModelis something that Angular adds to the DOM object
// Two-way Binding
<input [(ngModel)]="email" (keyup.enter)="onKeyUp()" />
import { Component } from '@angular/core';

@Component({
  selector: 'courses',
  template: `
    <input [(ngModel)]="email" (keyup.enter)="onKeyUp()" />
  `
})

export class CoursesComponent {
  email = "me@example.com";

  onKeyUp(){
    console.log(this.email);
  }
}
Step 2: Import the 'forms' Module
ngModelis defined in one of the models calledformsand by default, it's not imported in your application

- Go to
app.module.tsand add theFormsModule
// Import Forms module
import { FormsModule } from '@angular/forms';
- Import
FormsModulein our main AppModule
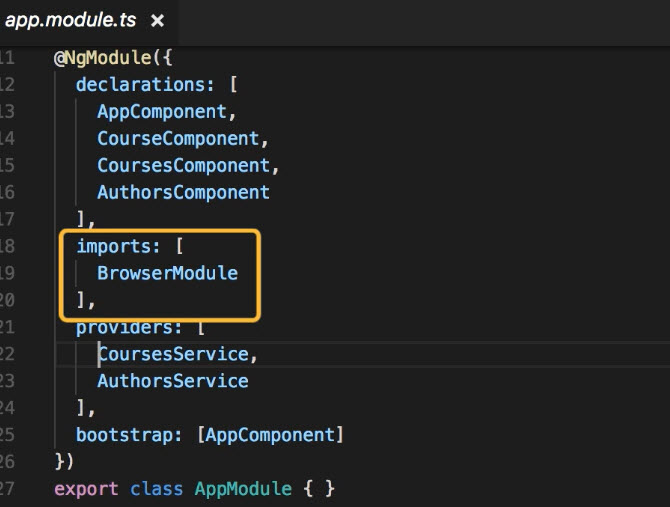
if you miss this step, you will get an error
Can't bind to 'ngModel' since it isn't a known property of 'input'in the consoleBack to the page, we change input to
me@domain.comand examine the console. This time, we gotme@domain.com
Pipes
- We use pipes
|to format data - Built-in Pipes
- Uppercase
- Lowercase
- Decimal
- Currency
- Percent
- Arguments
- number e.g. 1.2-2
- 1st digit: number of integer digits
- 2nd digit: min number of digits after decimals
- 3rd digit: max number of digits after decimals
- Round-up
- currency
- Accepts multiple arguments
- date
- For a full list of arguments, visit https://angular.io/api/common/DatePipe
- number e.g. 1.2-2
@Component({
  selector: 'courses',
  template: `
    {{course.title | uppercase | lowercase}} <br/>
    {{course.students | number}} <br/>
    {{course.rating | number: '1.2-2'}} <br/>
    {{course.price | currency: 'AUD': false: '3.2-2'}} <br/>
    {{course.price | currency: 'AUD': '3.2-2'}} <br/>
    {{course.releaseDate | date: 'shortDate'}} <br/>
  `
})

export class CoursesComponent {
  course = {
    title: "The Complete Angular Course",
    rating: 4.9745,
    students: 30123,
    price: 190.95,
    releaseDate: new Date(2016, 3, 1)
  }
}
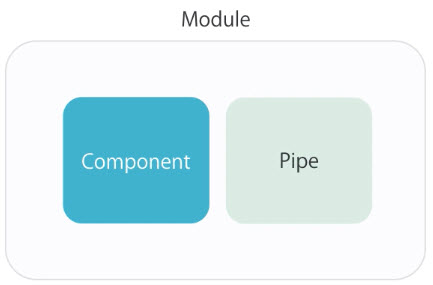
Custom Pipes
- Implement a custom pipes to summarize a long text
Step 1: Create and Config File 'app\summary.pipe.ts'
- Used the same convention that we've used when creating components and services
- Import the
Pipedecorator function andPipeTransforminterface that shapes of all pipes in Angular - Refer to https://angular.io/api/core/PipeTransform to view signature of the
PipeTransforminterface - Add the
@Pipe()decorator function- Add a name property with the same name as the HTML markup
import { Pipe, PipeTransform } from '@angular/core';

@Pipe({
   name: 'summary'
})

export class SummaryPipe implements PipeTransform {
  transform(value: string, limit?: number){
    if (!value)
      return null;

    let actualLimit = (limit)? limit: 50;
    return value.substr(0, actualLimit) + ' ...';
  }
}
Step 2: Register Custom Pipe in AppModule
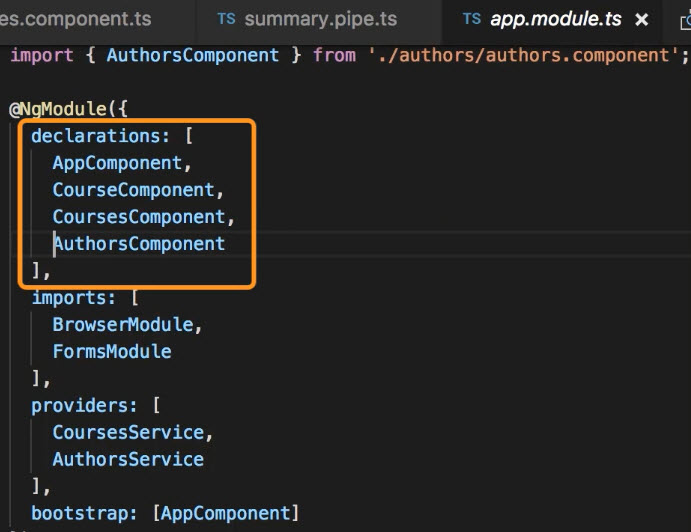
- Go to
app.module.tsand addSummaryPipein@NgModule- Note the auto import of SummaryPipe on the top of file
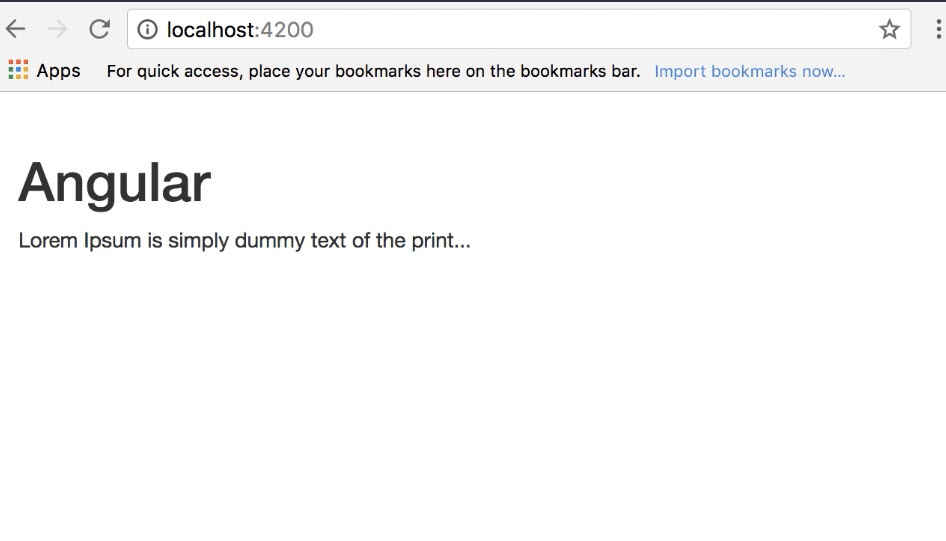
// File: courses.component.ts

import { Component } from '@angular/core';

@Component({
  selector: 'courses',
  template: `
    {{text | summary:10 }}
  `
})

export class CoursesComponent {
  text = `Lorem Ipsum is simply dummy text of the printing and typesetting industry. Lorem Ipsum has been the industry's standard dummy text ever since the 1500s, when an unknown printer took a galley of type and scrambled it to make a type specimen book.`;
}